Cooking & Coffee: Carnitas Tacos & KAHA Coffee Happy Medium Blend
By Tyler Workman
In our latest series, Cooking & Coffee, we will be bringing you recipes of some of our favorite dishes paired with a coffee that compliments that dish. We will sometimes also bring you a stand alone dish that uses coffee as one of the ingredients and we will describe how the coffee interacts with the flavors of that dish.
One of our all time favorite cuisines is Mexican food! For this first installment of Cooking & Coffee we will share our favorite recipe for delicious pork carnitas tacos including a fresh Pico de Gallo salsa and paired with our Happy Medium Blend.
Traditionally pork carnitas are deep fried in animal fat for a crispy outside and a tender and juicy inside. This recipe is based on a Rick Bayless (Frontera Restaurant) recipe which calls for slow roasting the pork to achieve the same crispy outside and juicy inside texture without deep frying.
Makes 6 servings yields about 1 3/4 lb to 2 lbs of finished carnitas
INGREDIENTS:
Carnitas:
4 lbs bone-in or boneless pork shoulder (or pork butt) cut into 1 1/2- to 2-inch slabs
Salt - We use Himalayan pink salt freshly ground, but any salt will do.
Pico de Gallo Salsa:
4-6 medium tomatoes - We use vine ripe or cluster tomatoes, but you can use any tomato
1 large onion - We recommend a white or red onion. For this recipe we will use a white onion
1 fresh bunch of Cilantro (also called Coriander)
1-2 medium to large Jalapeno peppers
The juice of one 1/2 of a lime (fresh will taste much better than a concentrate)
Salt - We use Himalayan pink salt freshly ground, but any salt will do.
Tortillas:
1 package of corn tortillas (yes we're using store bought)
Carnitas Instructions:
Heat your oven to 375 degrees. Cut each slab of pork in half and lay the pieces in a baking sheet (they should fit into a 13 x 9-inch baking sheet with space around each slab). Liberally sprinkle with salt (about 1 teaspoon) on all sides. Pour 1/3 cup water around the meat, cover tightly with foil (we recommend using foil on the baking sheet and to cover), and bake for 1 hour.

Raise the oven temperature to 450 degrees to get the crunchy texture. Uncover the meat and cook until the liquid has completely reduced and only the rendered fat remains, about 30 mins. A warning: clean your over before cooking these carnitas. If there are pieces of food at the bottom the oven will smoke at this temperature and smoke alarms may go on. We know this from experience! :-)
Now, roast the slabs, and flip the slabs over every 7 or 8 minutes, until slightly browned, about 20 mins more total. Break the meat into large chunks or shred slightly.

Pico de Gallo Salsa Instructions:
With a sharp knife (we use a Chef's knife) core the tomatoes, discarding of the core. Now cut the tomatoes into quarters and de-seed the quarters, discarding the seeds and gel (if you leave the seeds and gel in the salsa will be too watery). Now dice the tomatoes into small squares about a quarter of an inch square or slightly larger and put into a mixing or serving bowl (we use a rectangular Pyrex glass dish).
Next cut the top and bottom stem portion of the white onion and peel the first couple of outer layers of the white onion which look like paper. Cut the onion in half and begin to dice the onion into small squares about a quarter of an inch square or slightly larger and put into a mixing or serving bowl with the tomatoes you diced.
Next twist the top of the bunch of Cilantro (removing the leaves from the stems) and chop the cilantro leaves medium fine. You can use the entire bunch or a portion of the bunch for your Pico de Gallo (to taste). Put the chopped Cilantro in the mixing or serving bowl with the tomatoes and onions you diced.
Next cut the top off of your Jalapeno(s) (use one or two to taste). If you would like a mild Pico de Gallo, de-vein and de-seed the Jalapeno(s) by cutting the Jalapeno length wise then carefully filet the veins and seeds then discard. If you would like a spicy hot Pico de Gallo leave the veins and seeds. Now dice the Jalapeno(s) into tiny, tiny squares. A warning: be careful not to get Jalapeno oil on your hands and touch your eyes. Put the diced Jalapeno(s) in the mixing or serving bowl with the tomatoes, onions, and Cilantro.
Next take a spoon or spatula and mix the tomatoes, onions, cilantro and jalapenos together well. You can adjust the ratio of tomatoes, onions, cilantro, jalapenos more or less the next time you make this to get the ratio just right for your taste.
Finally squeeze the juice of one half of a fresh lime over the salsa and mix well. Add salt if desired.

Taco Assembly:
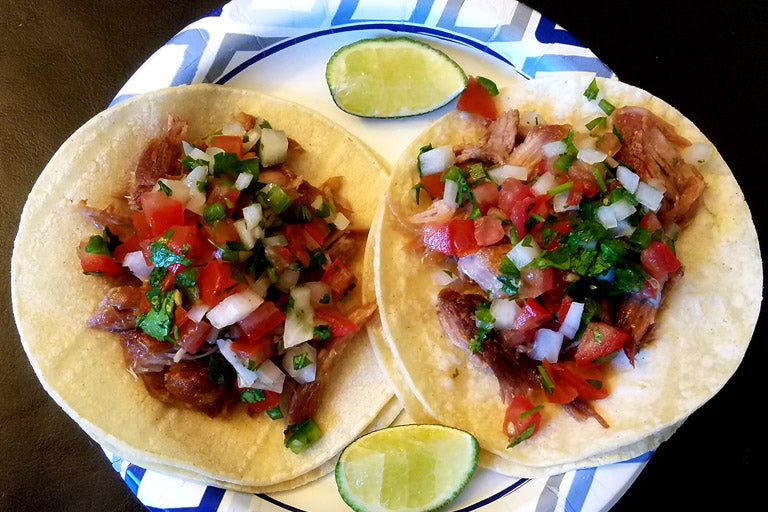
Warm a stack of corn tortillas in the microwave (we wrap a stack in a paper towel) or slightly in a toaster oven, in a frying pan, etc. just to get them warm enough to be pliable. Put 1-2 tortillas down on a plate (two tortillas gives better support and structure for the taco) then top generously with your pulled or shredded carnitas and next top with a few spoonfuls of Pico De Gallo. Garnish with lime wedges and squeeze on the tacos to taste.

Happy Medium Blend Coffee
We believe our Happy Medium Blend is the perfect compliment to the balance of the fresh crisp acidity of the Pico de Gallo Salsa and the deep, juicy, and flavorful pork of the Carnitas. Our Happy Medium Blend has notes of Brown sugar, plum, and is extremely well balanced with a bright lively acidity and a medium body. The coffee beans that make up our Happy Medium Blend are Fair Trade coffee beans from the Cajamarca region of Peru. The processing is 100% washed and varietals include Catuai, Bourbon, Caturra, and Typica to give the perfect balance of flavor profile, acidity, and body.
Click to shop Happy Medium Blend

We have two recommendations for brew method of the Happy Medium Blend to pair with your Pork Carnitas Tacos:
1. Drip - If you are having a group of people over for a taco party, make a full pot of Happy Medium in your favorite drip coffee machine. Remember to clean and maintain your coffee makers (see our article HERE) and grind your whole bean coffee just before brewing (if possible). For a drip machine we recommend using the "Golden Ratio" of 1 part coffee to 18 parts water (1:18) or somewhere between 1:15 - 1:18 by weight (measured in grams for both coffee and water. milliliters also translate directly to grams) if you are using scales. If you are measuring by volume, the measurement is usually between 1-2 tablespoons of ground coffee to every 6 oz (1 coffee cup) of water. These ratios can be adjusted to taste. If using a drip coffee machine we recommend an SCA certified coffee brewer such as those listed at: https://sca.coffee/certified-home-brewer if possible, but the most important step to great coffee is starting with a fresh and high quality coffee.
2. Pour Over - Chemex Brew Method. Depending on the model of Chemex pour over brewer, you can brew between 3-10 cups at a time. The pour over method takes some time to master the technique and timing but it is an amazing experience compared to many other coffee brewing methods. If you already brew with a Chemex, you will know exactly what to do. If you are new to the Chemex we recommend the following (Makes four 6 oz cups):
Chemex Brewing Instructions:
• Coffee Dose (how much coffee to use): We recommend measuring out 50 grams of coffee *we recommend a scale and timer for all pour over brewing methods to measure out coffee, to make sure your ratio is exact and to help control your pour rate.
• Ratio (Coffee to Water Ratio): We recommend using 700 grams of filtered or purified water (not tap water, distilled or reverse osmosis water). You can adjust the ratio based on your taste and how strong you like your coffee.
• Grind Size: We recommend grinding your coffee fresh using a burr grinder. We recommend a 20 grind size on the Baratza Encore grinder which is somewhere around a medium coarseness. Some brew guides recommend a slightly coarser grind, closer to a medium-coarse and sea salt coarseness. Try different settings to see what you like best.
Step 1
Measure out your coffee and your water. Measure out your coffee as per the instructions above, 50 grams of coffee to 700 grams of water (make sure you have extra in the kettle to pre-rinse and pre-heat).
Step 2
Grind your coffee right before you about to brew your coffee for optimal freshness.
Step 3
Heat your water. We recommend a higher water temperature since lighter roasted coffees require a higher temperature to extract the soluble compounds of the coffee, so somewhere between 200 – 212 degrees Fahrenheit. For this brew we will heat our water to 205 degrees. *We recommend the use of a gooseneck kettle for all pour over brew methods for better control when pouring your water.
Step 4
Unfold your filter and place it in your Chemex. Make sure that side with three (3) sheets of your pre-folded filter is facing the pour spout and rests over the pour spout without blocking it, and the side with one (1) sheet is facing the back of the Chemex brewer.
Step 5
Pre-rinse the filter and pre-heat the brewer by pouring some of the hot water from your kettle into the filter making sure to fully saturate the filter to get rid of any paper taste of the filter. Swirl the hot water in the bottom chamber to pre-heat the brewer so the brewing temperature is consistent throughout brewing.
Step 6
Empty out the water from the Chemex brewer by carefully holding the filter in while pouring out the water on the opposite side that your hand is holding the filter in with.
Step 7
Pour your freshly ground coffee grinds into the Chemex filter, then give the brewer a little shake to level the coffee bed for even brewing. You can also take your finger and place a divot in the center of the coffee bed to assist with the bloom phase.
Step 8
Press the “Tare” button on your scale to zero out the weight of the Chemex brewer and the coffee grinds so that from here on out you will only be measuring how much water you are pouring into the Chemex brewer. The scale should now read zero.
Step 8
First Pour, the bloom phase. There will be four (4) pours and this first pour will begin the bloom phase.Pour twice the amount of water as you have coffee, so for this recipe you will pour 100 grams of water since we are using 50 grams of coffee. Pour slowly and steadily in the center into the divot until your scale reads 100 grams. Allow the coffee to “bloom” this is the coffee de-gassing where the coffee grinds are releasing Carbon Dioxide (C02) which has built up in the coffee as part of the roasting process. Allow the coffee to bloom for 30-40 seconds so that the coffee is now ready to evenly extract for brewing.
Step 9
Second pour. Starting in the center of the coffee bed, begin pouring slowly and steadily in a circle motion from the center to the outer edge of the coffee bed to ensure all of the grinds in the coffee bed are being evenly saturated. Once you have poured 200 grams of water (the scale will read 300 grams total for the 100 grams of the first pour and 200 grams of the second pour), you can stop until the water drains just enough to where the coffee grinds begin to show through the surface of the water.
Step 10
Third and fourth pour. Repeat the same pour technique as Step 9 adding another 200 grams of water until the water drains just enough to where the coffee grinds begin to show through the surface of the water. Then repeat the process one final time adding another 200 grams for the fourth and final pour.
Step 11
Let the water completely drain through the coffee grinds.
Brew Time
The brew should have taken between 3- 4 minutes total (including the bloom time) or slightly longer at 4.5 minutes. If the brew time was too fast you may want to try using a finer grind size and a slower pouring rate. If the brew time was too slow you may want to try using a coarser grind size and a slightly faster pouring rate.
Extraction
If your coffee came out tasting bitter or dry (astringent) or empty tasting, chances are the coffee is over extracted most likely due to a grind size that was too fine and/or a pour rate and brew time that was too long. If you’re coffee came out tasting sour, lacking any sweetness, and with zero lingering finish on your tongue and throat, chances are the coffee is under extracted most likely due to a grind size that was too coarse and/or a pour rate and brew time that was too fast. If you’re coffee came out with notes of fruitiness, a bright, crisp acidity and a little longer finish on the tongue and throat, chances are you brewed yourself a great cup of coffee!

Drip Coffee & Chemex Pour Over
Pour Over coffee is difficult to master at first, and takes some time, but with practice, a scale and a timer you will be brewing barista quality coffee faster than you think!
*Alternatively you can prepare the Happy Medium Blend in your favorite brew method. We encourage experimenting with various brew methods, grind sizes, etc. to see what you like best.

0 comments